This tutorial will show you how to create a Next.js application that:
- Fetches content from a PostgreSQL database (Supabase)
- Updates content without needing to redeploy to Vercel
- Serves optimized, blur-up images with
next/image - Easily styles components with Tailwind CSS
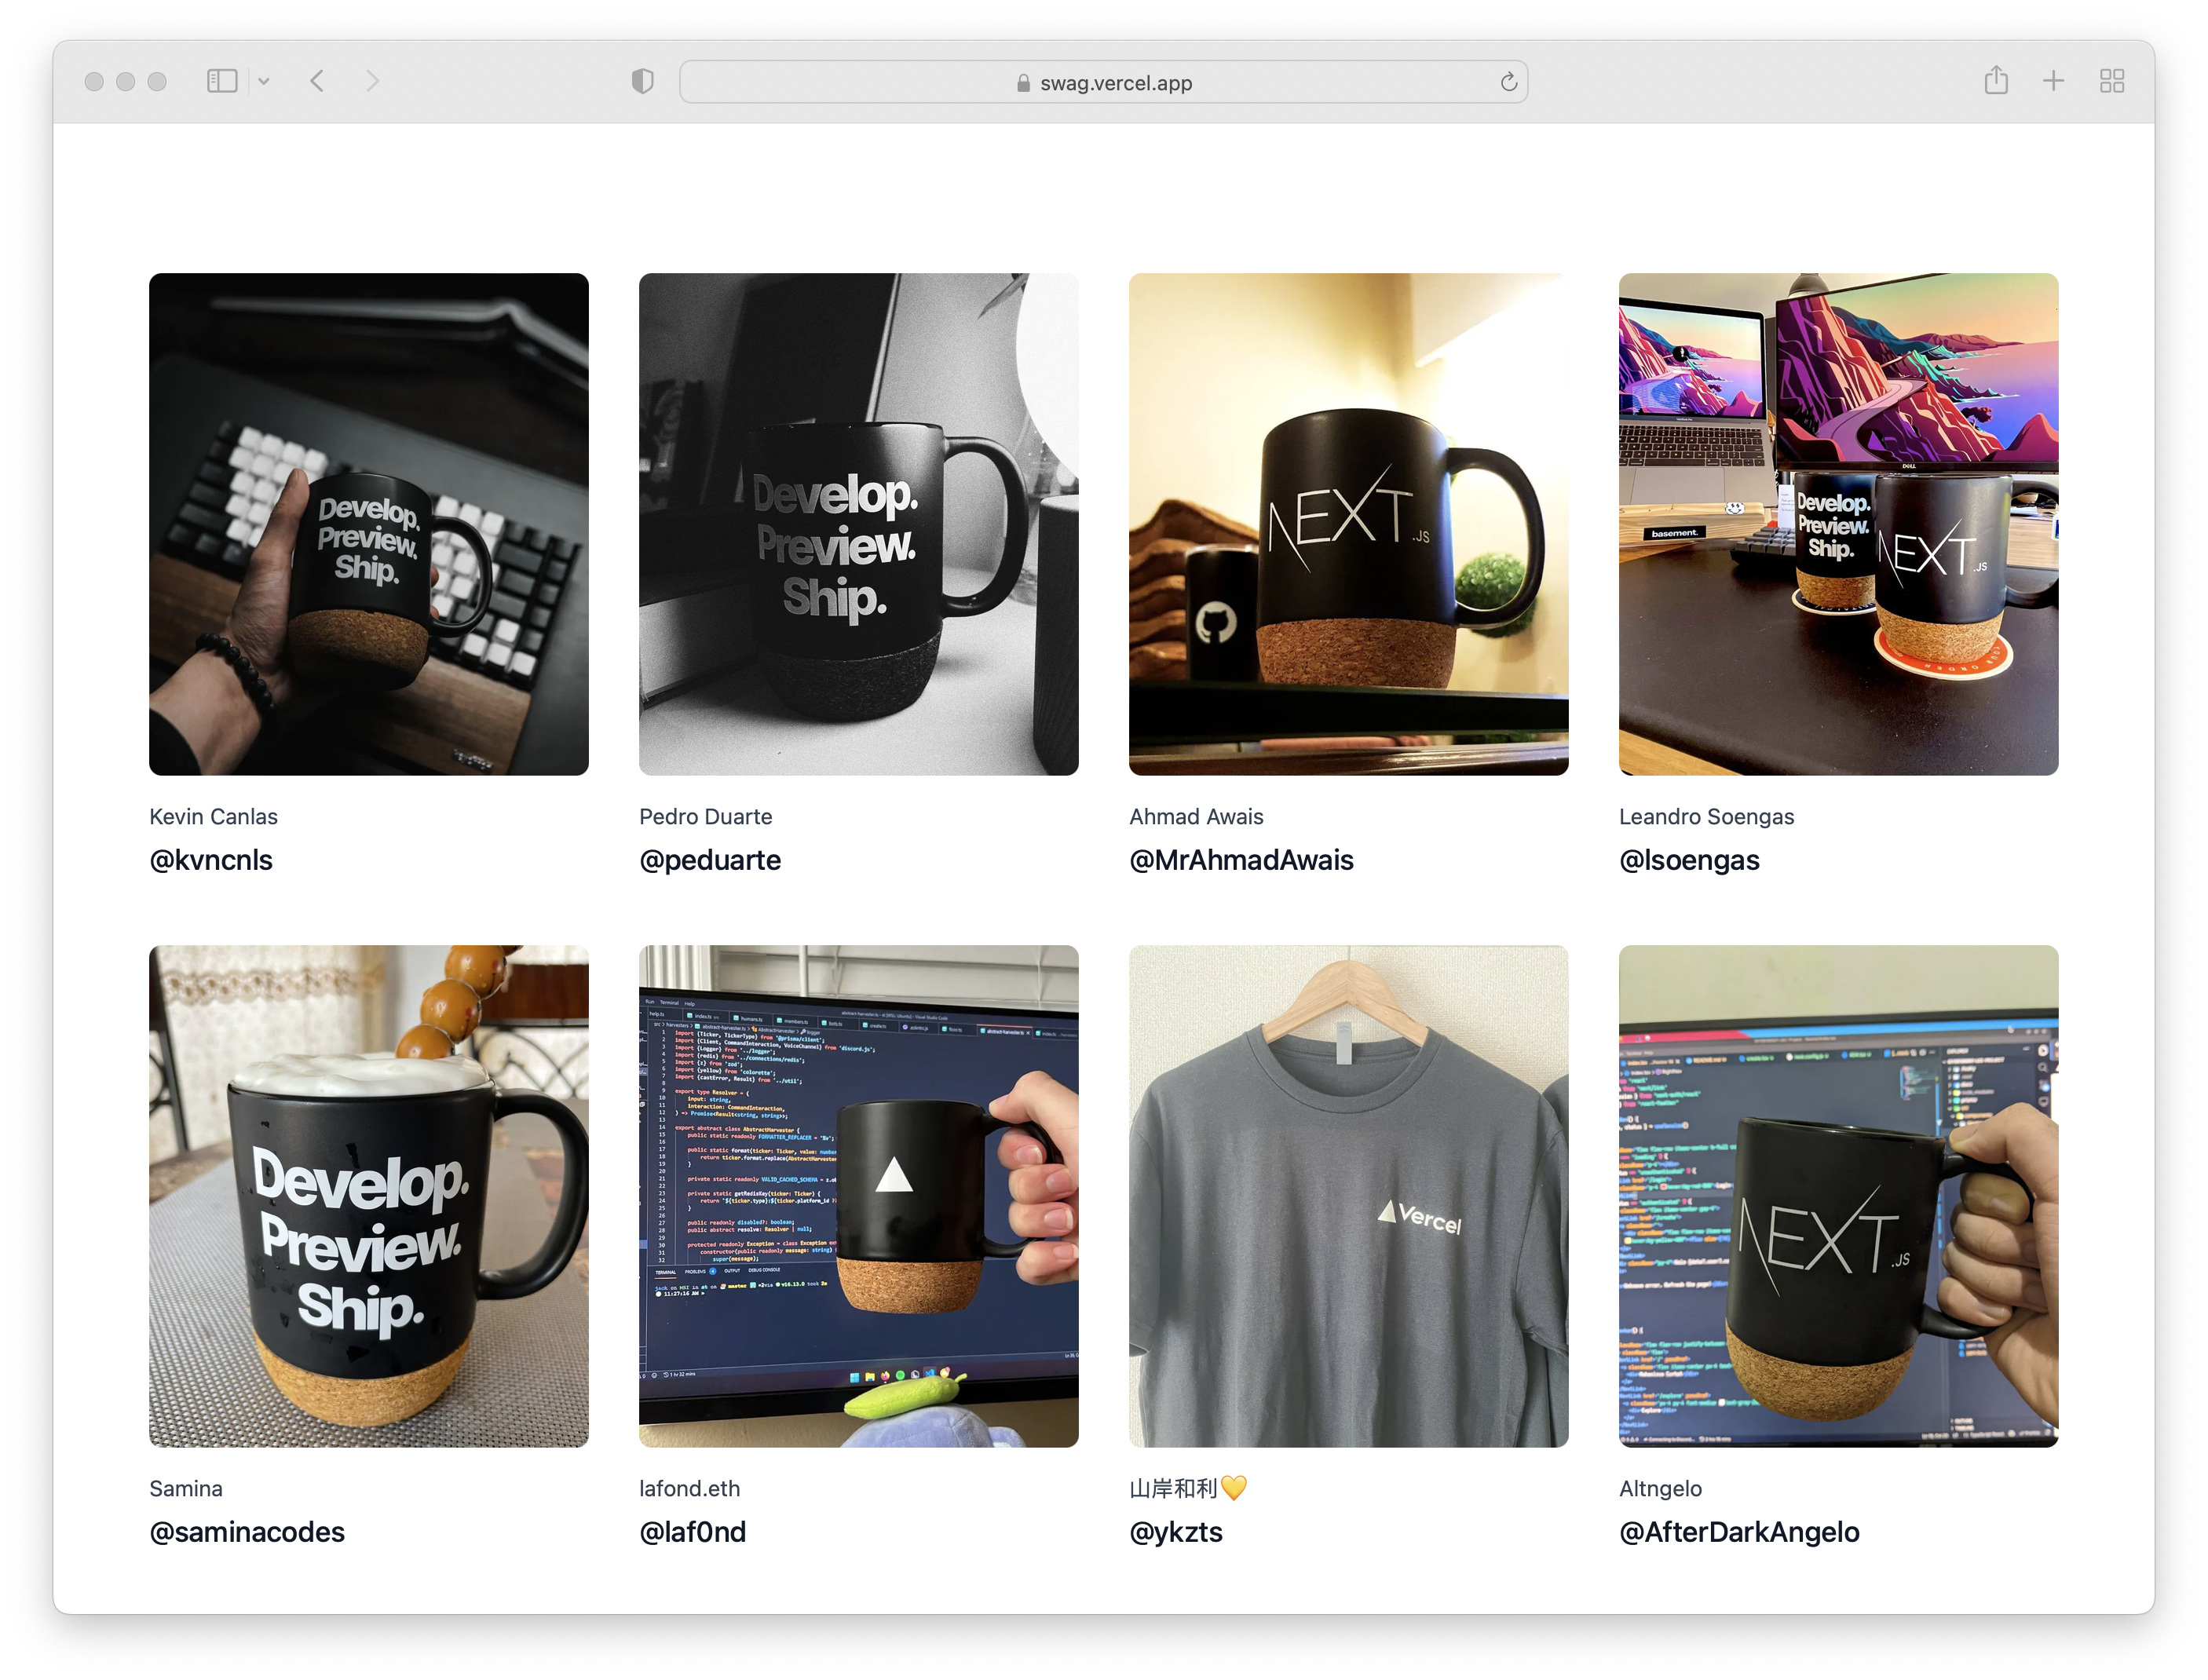
I used this to create swag.vercel.app, which is a collection of tweets from the Next.js community showing off their swag.
Getting Started
To set up your application, we can use create-next-app to clone a Next.js and Tailwind CSS starter application from the official examples directory.
npx create-next-app --example with-tailwindcss image-galleryThis example includes:
- The latest version of Next.js
- Prettier configured to format code and organize Tailwind CSS class names
- TypeScript configured for Next.js
- Tailwind CSS configured to strip away unused class names
- An example Next.js API Route
Styling the Image Gallery
Now that Tailwind is configured, we can create components to style our image gallery. Inside pages/index.tsx, which is the entry point into our application, let's use CSS Grid to set up the container for our images. We'll add some padding and grid spacing, which conditionally changes based on the viewport.
export default function Gallery() {
  return (
    <div className="max-w-2xl mx-auto py-16 px-4 sm:py-24 sm:px-6 lg:max-w-7xl lg:px-8">
      <div className="grid grid-cols-1 gap-y-10 sm:grid-cols-2 gap-x-6 lg:grid-cols-3 xl:grid-cols-4 xl:gap-x-8">
        {/* Images will go here */}
      </div>
    </div>
  );
}
Next, we need to create a component for the individual image. Not only do we want to show the image, but we also would like to show some additional metadata. In this instance, I'm adding a name and Twitter handle. Each image will also link out to the original tweet.
Let's make a new component with placeholder data:
function Image() {
  return (
    <a href="#" className="group">
      <div className="w-full aspect-w-1 aspect-h-1 bg-gray-200 rounded-lg overflow-hidden xl:aspect-w-7 xl:aspect-h-8">
        <img
          alt=""
          src="https://bit.ly/placeholder-img"
          className="group-hover:opacity-75"
        />
      </div>
      <h3 className="mt-4 text-sm text-gray-700">Lee Robinson</h3>
      <p className="mt-1 text-lg font-medium text-gray-900">@leeerob</p>
    </a>
  );
}
We're using group modifiers to make the hover area the entire component, including the text, making the image's opacity dimmed. We're also ensuring the image maintains a 1:1 aspect ratio (square), which requires a Tailwind CSS plugin. Let's install that.
npm i -D @tailwindcss/aspect-ratioThen, we can update our tailwind.config.js file:
module.exports = {
  content: [
    './pages/**/*.{js,ts,jsx,tsx}',
    './components/**/*.{js,ts,jsx,tsx}',
  ],
  theme: {
    extend: {},
  },
  plugins: [require('@tailwindcss/aspect-ratio')],
};
Optimizing Images
To help achieve good Core Web Vitals, we want to optimize images. Next.js provides an Image component that gives us:
- Faster Page Loads: Images are only loaded when they enter the viewport
- Visual Stability: Prevents Cumulative Layout Shift automatically
- Improved Performance: Images use modern image formats (like WebP) for smaller file sizes and serve smaller images based on the device size
Let's update our Image component to use next/image, and rename it to BlurImage to prevent a naming collison with the Image component we imported:
import Image from 'next/image';

function BlurImage() {
  return (
    <a href="#" className="group">
      <div className="w-full aspect-w-1 aspect-h-1 bg-gray-200 rounded-lg overflow-hidden xl:aspect-w-7 xl:aspect-h-8">
        <Image
          alt=""
          src="https://bit.ly/placeholder-img"
          layout="fill"
          objectFit="cover"
          className="group-hover:opacity-75"
        />
      </div>
      <h3 className="mt-4 text-sm text-gray-700">Lee Robinson</h3>
      <p className="mt-1 text-lg font-medium text-gray-900">@leeerob</p>
    </a>
  );
}
We'll use the fill layout and object-fit CSS property to properly scale the image.
The Next.js Image component requires an allowlist to specify which domains we can optimize images from. While we're using bit.ly as a placeholder, we can add any domain we want to the allowlist inside next.config.js:
/** @type {import('next').NextConfig} */
module.exports = {
  reactStrictMode: true,
  images: {
    domains: ['bit.ly'],
  },
};
Blurred Placeholders for Images
When images are loading, we'd like to show a blurred version for a better user experience. While the Image component does include this for local image files, we're going to be retrieving images from Supabase soon. Instead, we can use onLoadingComplete and CSS animation + blur to achieve a similar effect.
import Image from 'next/image';
import { useState } from 'react';

function cn(...classes: string[]) {
  return classes.filter(Boolean).join(' ');
}

function BlurImage() {
  const [isLoading, setLoading] = useState(true);

  return (
    <a href="#" className="group">
      <div className="w-full aspect-w-1 aspect-h-1 bg-gray-200 rounded-lg overflow-hidden xl:aspect-w-7 xl:aspect-h-8">
        <Image
          alt=""
          src="https://bit.ly/placeholder-img"
          layout="fill"
          objectFit="cover"
          className={cn(
            'group-hover:opacity-75 duration-700 ease-in-out',
            isLoading
              ? 'grayscale blur-2xl scale-110'
              : 'grayscale-0 blur-0 scale-100'
          )}
          onLoadingComplete={()=> setLoading(false)}
        />
      </div>
      <h3 className="mt-4 text-sm text-gray-700">Lee Robinson</h3>
      <p className="mt-1 text-lg font-medium text-gray-900">@leeerob</p>
    </a>
  );
}
Now, let's replace our placeholder data with real items from Supabase.
Setting Up Supabase
Supabase makes it really easy to create your backend, giving you a PostgreSQL database in a few clicks. Inside our Supabase dashboard, let's configure our new project:
- Click "New project"
- Choose your organization
- Pick a name, database password, and click "Create new project"
After your project is created, you'll want to click copy and save these two values:
- Project API keys →
service_role: This is how we'll securely connect to Supabase on the server. - Configuration → URL: This is the API endpoint the Supabase client will use to fetch and edit data.
Save these values as Environment Variables inside a new file .env.local inside your Next.js application:
NEXT_PUBLIC_SUPABASE_URL=your-value-here
SUPABASE_SERVICE_ROLE_KEY=your-value-here
Next, install the Supabase client:
npm i @supabase/supabase-jsFinally, we can create a new client and connect to Supabase using our environment variables:
import { createClient } from '@supabase/supabase-js';

const supabaseAdmin = createClient(
  process.env.NEXT_PUBLIC_SUPABASE_URL,
  process.env.SUPABASE_SERVICE_ROLE_KEY
);
Adding Data to Supabase
First, we will need to create a new table inside Supabase for our images.
- We'll name our table
images - We'll keep the
idandcreated_atcolumns as is - Let's add
name,href,userName, andimageSrccolumns, which are alltext - Click "Save" and we're done!
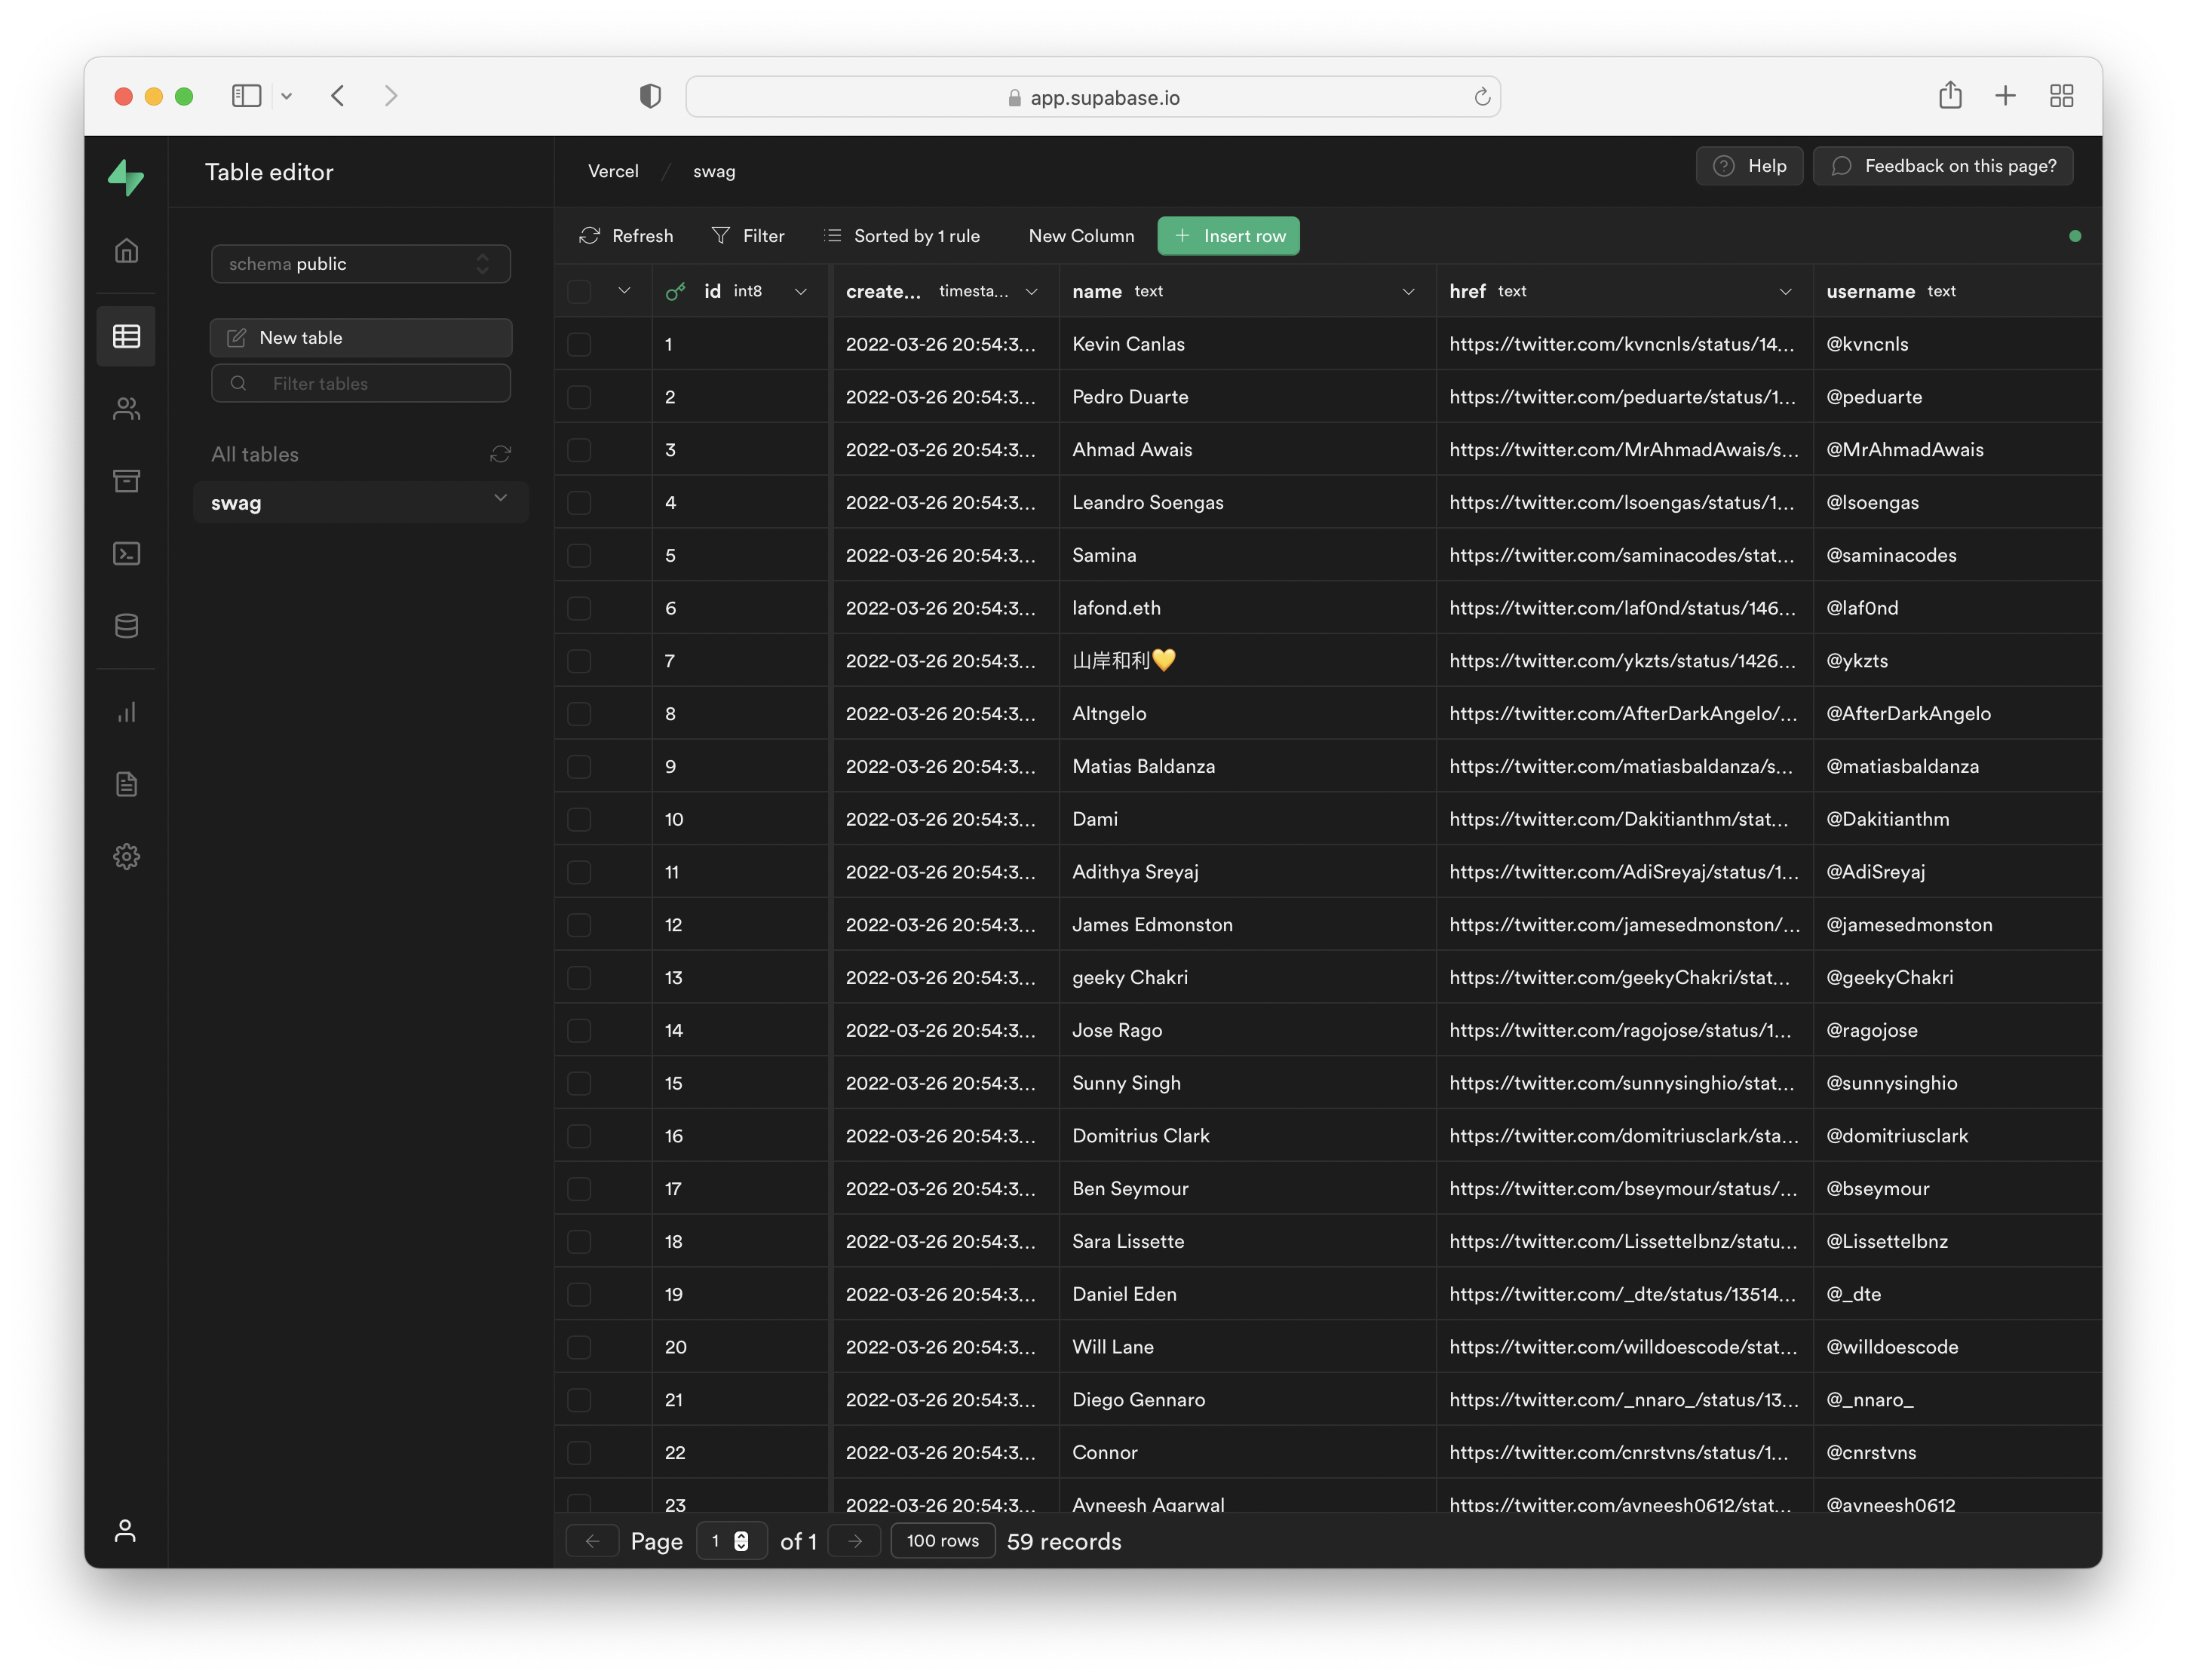
We can add data directly through the Supabase web editor.
Fetching Data from Supabase
We've already set up our Supabase client in the file, so we can select all images from our images table:
const { data } = await supabaseAdmin.from('images').select('*');We'll fetch this data inside getStaticProps. This function allows you to fetch data on the server and return it as props for the default React component exported in the Page:
import { createClient } from '@supabase/supabase-js';

const supabaseAdmin = createClient(
  process.env.NEXT_PUBLIC_SUPABASE_URL,
  process.env.SUPABASE_SERVICE_ROLE_KEY
);

export async function getStaticProps() {
  const { data } = await supabaseAdmin.from('images').select('*');
  return {
    props: {
      images: data,
    },
  };
}

type Image = {
  id: number;
  href: string;
  imageSrc: string;
  name: string;
  username: string;
};

export default function Gallery({ images }: { images: Image[] }) {
  return (
    <div className="max-w-2xl mx-auto py-16 px-4 sm:py-24 sm:px-6 lg:max-w-7xl lg:px-8">
      <div className="grid grid-cols-1 gap-y-10 sm:grid-cols-2 gap-x-6 lg:grid-cols-3 xl:grid-cols-4 xl:gap-x-8">
        {/* Images will go here */}
      </div>
    </div>
  );
}
We'll also add a type for our Image data returned from Supabase. Next, we can update our placeholder for images to use the real data. We'll also use our new BlurImage component, which makes use of next/image under the hood:
export default function Gallery({ images }: { images: Image[] }) {
  return (
    <div className="max-w-2xl mx-auto py-16 px-4 sm:py-24 sm:px-6 lg:max-w-7xl lg:px-8">
      <div className="grid grid-cols-1 gap-y-10 sm:grid-cols-2 gap-x-6 lg:grid-cols-3 xl:grid-cols-4 xl:gap-x-8">
        {images.map((image) => (
          <BlurImage key={image.id} image={image} />
        ))}
      </div>
    </div>
  );
}
After mapping through the list of images, we forward the current image as a prop to our BlurImage component. Let's update that component to replace the placeholder data:
function BlurImage({ image }: { image: Image }) {
  const [isLoading, setLoading] = useState(true);

  return (
    <a href={image.href} className="group">
      <div className="w-full aspect-w-1 aspect-h-1 bg-gray-200 rounded-lg overflow-hidden xl:aspect-w-7 xl:aspect-h-8">
        <Image
          alt=""
          src={image.imageSrc}
          layout="fill"
          objectFit="cover"
          className={cn(
            'group-hover:opacity-75 duration-700 ease-in-out',
            isLoading
              ? 'grayscale blur-2xl scale-110'
              : 'grayscale-0 blur-0 scale-100'
          )}
          onLoadingComplete={()=> setLoading(false)}
        />
      </div>
      <h3 className="mt-4 text-sm text-gray-700">{image.name}</h3>
      <p className="mt-1 text-lg font-medium text-gray-900">{image.username}</p>
    </a>
  );
}
Finally, we'll want to update our image optimization allowlist to use the Twitter image URL:
/** @type {import('next').NextConfig} */
module.exports = {
  reactStrictMode: true,
  images: {
    domains: ['pbs.twimg.com'],
  },
};
Deploying to Vercel
Our image gallery is now showing a list of images, fetched from Supabase, and displayed nicely using Tailwind CSS. Let's deploy our Next.js application to Vercel:
- Push your code to your git repository (e.g. GitHub, GitLab, BitBucket)
- Import your Next.js project into Vercel
- Add your Environment Variables during the import
- Click "Deploy"
Vercel will auto-detect you are using Next.js and enable the correct settings for your deployment. Finally, your application is deployed at a URL like swag.vercel.app.
During the build process (next build), your application made a request to Supabase (by running getStaticProps) to fetch the images needed and generate an HTML file for the page. This file is static and does not change when you update your database.
For example, if you added a new image to the table, it would not be shown on your deployed application without rebuilding the entire app. Let's fix that.
On-Demand Incremental Static Regeneration
Next.js 12.1 included a helpful feature called on-demand ISR that allows you to fetch updated data for any page after it's been deployed. Incremental Static Regeneration allows you to keep the benefits of static files (which are fast and reliable) while still updating your site when data changes.
Let's enable our application to re-run getStaticProps when our images table changes.
Supabase Function Hooks
Function Hooks allow you to listen to any changes on your tables and trigger an asynchronous function. For example:
- I add a new row to my
imagestable (i.e.INSERT) - My function hook is triggered after the database row changes
- I'm able to call an API Route inside my application to fetch new data and rebuild the page
This means I'm able to instantly rebuild a single page of my application and push the new file to Vercel's Edge Network in 300ms globally 🤯
Creating our Revalidation API Route
Inside our Next.js application, we'll make a new API Route to revalidate our page. This route is secured by a secret query parameter that our Supabase instance will forward, to ensure that only Supabase can regenerate pages when data changes.
export default async function handler(req, res) {
  // Check for secret to confirm this is a valid request
  if (req.query.secret !== process.env.REVALIDATE_SECRET) {
    return res.status(401).json({ message: 'Invalid token' });
  }

  try {
    // Regenerate our index route showing the images
    await res.revalidate('/');
    return res.json({ revalidated: true });
  } catch (err) {
    // If there was an error, Next.js will continue
    // to show the last successfully generated page
    return res.status(500).send('Error revalidating');
  }
}
You'll then want to add this new Environment Variable to your .env.local file, as well as on Vercel, before we deploy these changes.
NEXT_PUBLIC_SUPABASE_URL=your-value-here
SUPABASE_SERVICE_ROLE_KEY=your-value-here
REVALIDATE_SECRET=your-value-here
Creating our Function Hook
Inside the Supabase dashboard, click on your Database and then:
- Click "Function Hooks" on the left sidebar
- Click "Create a new hook"
- We'll name our hook
update_images - Table →
images - Events → Insert, Update, and Delete
- Type of hook → HTTP Request
- HTTP Request Method → POST
- HTTP Request URL →
your-url.vercel.app/api/revalidate - HTTP Params → Add a new param
secretwith your secret from above - Click "Confirm"
Our function hook is now active and will make a request to the specified HTTP Request URL whenever the images table changes.
On-Demand ISR in Action
First, redeploy your application to Vercel to add the new API Route as well as the new Environment Variable (REVALIDATE_SECRET). Next, add a new row to the images table inside Supabase.
After hitting "Save", you should see your deployed application update instantly!
Conclusion
In this tutorial, we were able to create a Next.js application showing a list of images fetched dynamically from Supabase and instantly update our deployed application whenever data changes.